


The Everest Three High Passes Trek is arguably the most spectacular trekking circuit in the world. Crossing the Renjo La, Cho La, and Kongma La (all above 5,300m) offers a 360-degree view of the Himalaya that the standard EBC trek simply cannot match.
However, if you scroll through any trekking forum – including our 160k+ strong Everest Base Camp Facebook group – you’ll find one question that sparks more debate than any other:
“Which direction should I go? Clockwise or Anti-Clockwise?”
At Pristine Nepal Treks, we’ve guided hundreds of trekkers through both routes. While there is no “wrong” way to see Everest, there is a smarter way to do it and here is the definitive breakdown to help you decide.
Detailed Trek Route: Distance & Elevation
The Everest Three Passes Trek covers approximately 166 km (103 miles). It is a massive circuit that touches the highest trekking points in the Khumbu.
The Three Giants (The Passes)
- Kongma La Pass: 5,535m (18,159 ft) – The Highest & Toughest
- Cho La Pass: 5,420m (17,782 ft) – The Most Technical (Glacier Crossing)
- Renjo La Pass: 5,360m (17,585 ft) – The Best Views of Everest
Comparison at a Glance: Which Direction Wins?
| Feature | Anti-Clockwise (The Standard) | Clockwise (The Alternative) |
| First Pass | Kongma La (5,535m) | Renjo La (5,360m) |
| Acclimatization | Superior. Gradual ascent via Dingboche. | Risky. Faster ascent via Thame. |
| Cho La Difficulty | Steep descent; easier ascent from Dzongla. | |
| Crowds | More social; follow the “bubble.” | Quiet; walk against the crowd. |
| Visual Reward | Classic “reveal” of Gokyo at the end. | “Curtain drop” views from Renjo La. |
Comparison at a Glance: Which Direction Wins?
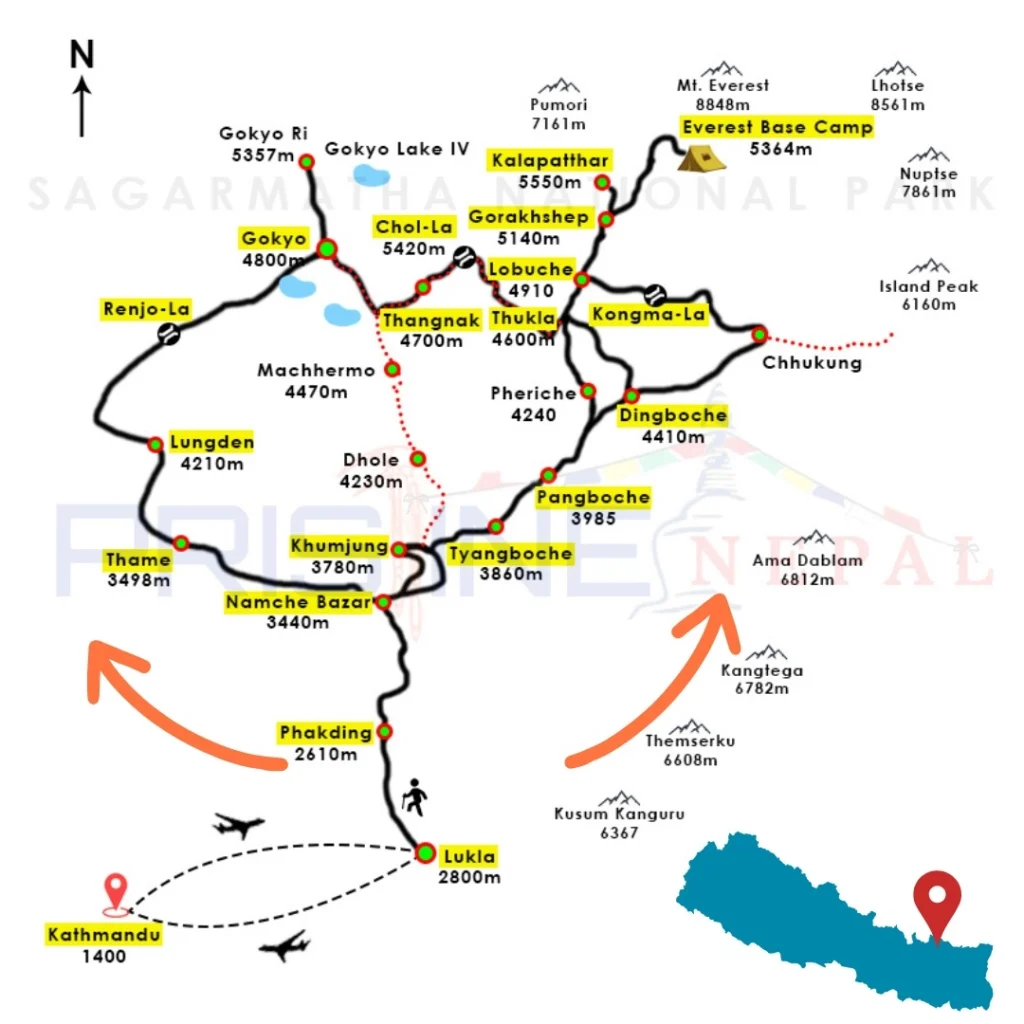
The Anti-Clockwise Route (The Standard Way):
Route: Namche ➔ Tengboche ➔ Dingboche ➔ Chukhung (Kongma La) ➔ Lobuche/EBC ➔ Dzongla (Cho La) ➔ Gokyo ➔ Thame (Renjo La) ➔ Namche.
Most trekking companies, including our team, generally recommend this direction. Here is why:
Pros:
- Superior Acclimatization: The ascent is more gradual. By the time you hit your first pass (Kongma La), you’ve already spent several nights at high altitude in Dingboche and Chukhung.
- The “Grand Finale” at Gokyo: Saving the Gokyo Lakes and the Renjo La for the final act is a psychological win. Many trekkers find the views from the Renjo La to be the most beautiful of the entire trip – a perfect reward for your hard work.
- Easier Cho La Ascent: Approaching Cho La from the East (Dzongla side) is a more manageable climb compared to the steep, icy scramble from the Gokyo side.
Cons:
- The Crowd: Because most groups go this way, you’ll be walking “with the flow,” meaning more people on the trails at the same time.
The Clockwise Route (The Alternative Way)
Route: Namche ➔ Thame ➔ Lungden (Renjo La) ➔ Gokyo ➔ Dragnag (Cho La) ➔ Lobuche/EBC ➔ Dingboche (Kongma La) ➔ Namche.
Pros:
- Solitude: You are walking against the grain. While hundreds head toward Tengboche, you head toward the quiet valley of Thame.
- The “Wow” Factor: Coming over the Renjo La from the West provides a sudden, breathtaking “curtain drop” view of Everest and the Gokyo Lakes that hits you all at once.
Cons:
- Rapid Ascent Risk: You reach high altitude much faster. The jump from Namche (3,440m) to Lungden (4,380m) and then over a 5,360m pass requires very strict discipline and extra rest days to avoid AMS (Acute Mountain Sickness).
- The Cho La Scramble: Climbing the Cho La from the Gokyo side is notorious for being a steep, slippery rock-and-ice scramble that can be intimidating for those afraid of heights.
The Verdict: Which should you choose?
Choose Anti-Clockwise if:
You are worried about altitude sickness or if this is your first time trekking above 5,000m. This route is statistically safer for your body and offers a more social atmosphere.
Choose Clockwise if:
You are an experienced high-altitude trekker looking for peace, quiet, and a physical challenge. Only do this if you have built-in “buffer days” for acclimatization in Thame/Lungden.
Everest Three High Passes Trek Itinerary Both Clockwise and Anti Clockwise
The Anti-Clockwise Itinerary (Recommended)
Best for: Superior acclimatization and a safer ascent profile.
| Day | Route | Distance | Elev. | Walking Hrs |
| 1 | Fly to Lukla; Trek to Phakding | 8 km | 2,610m | 3-4 hrs |
| 2 | Phakding to Namche Bazaar | 11 km | 3,440m | 6 hrs |
| 3 | Acclimatization Day (Hotel Everest View) | 4 km | 3,880m | 3 hrs |
| 4 | Namche to Tengboche Monastery | 10 km | 3,860m | 5-6 hrs |
| 5 | Tengboche to Dingboche | 11 km | 4,410m | 5-6 hrs |
| 6 | Acclimatization Day (Nangkartshang Peak) | 5 km | 5,083m | 4 hrs |
| 7 | Dingboche to Chukhung | 5 km | 4,730m | 3 hrs |
| 8 | Pass #1: Kongma La to Lobuche | 10.5 km | 5,535m | 8-9 hrs |
| 9 | Lobuche to Everest Base Camp & Gorak Shep | 12 km | 5,364m | 7-8 hrs |
| 10 | Kala Patthar (Sunrise) & Trek to Dzongla | 11 km | 5,545m | 7 hrs |
| 11 | Pass #2: Cho La to Dragnag | 9.5 km | 5,420m | 8 hrs |
| 12 | Dragnag to Gokyo Lakes | 4.5 km | 4,750m | 3-4 hrs |
| 13 | Gokyo Ri (Sunset view) | 3 km | 5,357m | 3 hrs |
| 14 | Pass #3: Renjo La to Lungden | 11.5 km | 5,360m | 8-9 hrs |
| 15 | Lungden to Thame Village | 11 km | 3,800m | 5-6 hrs |
| 16 | Thame to Namche Bazaar | 10 km | 3,440m | 5 hrs |
| 17 | Namche to Lukla (The Long Walk) | 19 km | 2,840m | 7-8 hrs |
The Clockwise Itinerary
Best for: Solitude and “hidden” valley exploration first.
- Days 1-3: Lukla → Namche (Same as above).
- Day 4-5: Namche to Thame (3,800m) and Lungden (4,370m).
- Day 6: Pass #1: Renjo La to Gokyo (5,360m).
- Day 7-8: Gokyo Ri & Trek to Dragnag.
- Day 9: Pass #2: Cho La to Dzongla (5,420m).
- Day 10-12: Dzongla to Lobuche, EBC, and Kala Patthar.
- Day 13: Pass #3: Kongma La to Chukhung (5,535m).
- Day 14-17: Descent via Dingboche and Tengboche back to Lukla.
Pro Tips for Everest Three High Passes Trek
How many days do I really need?
Don’t trust the 15-day itineraries you see online. 18–21 days is the “Golden Window.” This allows for:
- Two acclimatization days (Namche and Dingboche/Gokyo).
- Two “Buffer Days” for Lukla flight weather or unexpected fatigue.
Solo Female Travelers: Safety First
As discussed in our community, Nepal is safe, but the Three Passes are technical. Trails across the Ngozumpa Glacier can shift overnight. We highly recommend joining a small group or hiring a guide. Having a proficient guide besides you doesn’t just keep you safe; it connects you to the Sherpa culture in a way solo trekking never can.
The “Micro-Spike” Mandate
Even in peak season, the Cho La Glacier can be a sheet of glass. Do not attempt this pass without micro-spikes. You can buy them in Namche Bazaar for about $15–$20. Your guide, like Hari Rai, will check these before you leave Dzongla.
The “Buffer Day” Strategy
Most 15-day itineraries fail because they don’t account for “The Lukla Factor.” In 2026, weather patterns are still shifting. Always build in 2 buffer days at the end of your trek in Kathmandu to ensure you don’t miss your international flight home.
Charging & Connectivity
Above 4,000m, batteries die 30% faster.
- Pro Tip: Sleep with your phone and camera batteries inside your sleeping bag near your body heat.
- Internet: Buy an Airalo eSIM or a local Ncell/NTC card in Kathmandu, but expect zero signal on the passes themselves.
Hydration vs. Altitude
You need to drink 4 liters of water per day. The dry Himalayan air dehydrates you through breathing alone. If you aren’t peeing clear, you are at risk for AMS. Avoid alcohol until you have crossed the final pass and are back in Namche.
Frequently Asked Questions: Everest Three High Passes Trek
- Is the Three Passes Trek harder than Everest Base Camp (EBC)?
Yes, significantly. While the EBC trek is a high-altitude hike, the Three Passes Trek involves crossing three distinct mountain passes over 5,300m (Kongma La, Cho La, and Renjo La). It requires higher physical fitness, longer days (8–10 hours), and basic navigation skills across shifting glaciers. - Which pass is the most difficult?
Most trekkers consider Kongma La (5,535m) the most difficult due to its steep ascent and the trek across the Khumbu Glacier. However, Cho La (5,420m) is the most technical, often requiring micro-spikes (crampons) to safely cross the icy sections and slippery rock scree. - Do I need crampons for the Three Passes Trek?
While you don’t need full mountaineering gear, we strongly recommend micro-spikes (chains for your boots). The Cho La pass often has a glaze of “black ice” or snow on the glacier section, making it very dangerous without extra traction. - Can I do the Three Passes Trek without a guide?
Since April 2023, the Nepal Tourism Board has implemented regulations regarding solo trekking. Beyond the rules, the Three Passes involve crossing the Ngozumpa and Khumbu glaciers, where trails change every season. Having a guide like those at Pristine Nepal Treks is essential for safety and navigation. - What is the best month for the Three High Passes?
The best windows are Spring (March to May) and Autumn (October to November). In March, you’ll see the rhododendrons blooming lower down, while October offers the clearest skies and most stable weather for crossing the high passes. - Is 15 days enough for the Three Passes?
15 days is the absolute minimum and often leaves no room for acclimatization or weather delays. For a safe and enjoyable experience, 18 to 21 days is the ideal duration. This ensures you aren’t forced to cross a pass during bad weather or while feeling the symptoms of altitude sickness.
Why Trek with Pristine Nepal Treks?
Whether you choose Clockwise or Anti-Clockwise, the success of your trek depends on your support team.
At Pristine Nepal Treks, we don’t just provide guides; we provide Himalayan experts, who understand the rhythm of the mountains. We prioritize our porters’ welfare (ensuring they have the best gear) and our guests’ safety.
Ready to stand on top of the world? [Click here to view our 20-Day Three Passes Itinerary] or message us directly to customize your route!